Wednesday, 25 April 2012

Sun Microsystems hardware Environmental figures

List of legacy Sun Microsystems hardware and it's Rack Unit Size, Weight British Thermal Units and Watt power consumption usage.


Model

Rack U's
Weight KG
BTU's
Watts
Sun Fire E25K
43
1143
81352
23927
Sun Fire E20K
43
996
44081
12965
Sun Fire E6900
43
544.3
31113
9120
Sun Fire E4900
17
131
14260
4180
Sun Fire E2900
12
141
12683
3300
Sun Fire V1280
12 114 11300 3300
Sun Fire V890
16
131 10912 3200
Sun Fire V490
5 44 5459 1600
Sun Fire V480
5 44 3754 1100
Sun Fire V440
4 37 2218 650
Sun Fire V240
2 26.5 1228 375
Sun Fire V210
1 21.5 996 322
Sun Fire V120
1 9 550 98
Sun Fire V100
1 6 280 54
Sun Fire T2000
2 17 1365 400
Sun Fire V40z
3 34 2133 625
Sun Fire V20z
1 15.88 1586 325
Sun Fire X4200
2 23.7 1536 550
Sun Fire X4100
1 18.6 1536 550
Sun Fire X2100
1 13 785 230
Sun Fire 15K
43 1159 81116 24000
Sun Fire 12K
43 1159 44081 24000
Sun Fire 6800
43 454.5 22030 6460
Sun Fire 4810
21 131.8 10625 3120
Sun Fire 4800
17 125 10370 3040
Sun Fire 3800
9 132 7775 2280
Sun Fire V880
16 131 7216 2115
Sun Fire V250
11 31 2150 460
Sun Fire 280R
4 38 3140 890
Sun Fire B1600
3 16 3415 1000
Sun Fire V60X
1 - 1171 350
Sun Fire V65X
2 - 1706 500
Enterprise 10000
40 818 52000 13456
Enterprise 6500
39 450 12000 3500
Enterprise 5500
39 450 12000 3500
Enterprise 4500
8 68 4680 1370
Enterprise 3500
15 72.5 3000 875
Enterprise 450
13 94 5680 1664
Enterprise 250
10 53 1980 610
Enterprise 250 w/casters
12 53 1980 610
Enterprise 420R
4 29.5 2080 610
Enterprise 220R
4 29.5 2080 610
StorEdge 6920
43 659 28000 -
StorEdge 6910
14 550 14000 4200
StorEdge 6960
27 1316 26000 8400
StorEdge 3910
14 667 12320 4200
StorEdge 3960
27 1300 26000 8400
StorEdge 6320
14 771 15000 4200
StorEdge 6120
3 41 - 500
StorEdge 6130
3 43 1228 360
StorEdge T3 Workgroup
3 30.4 1540 450
StorEdge T3 Enterprise
6 60.3 1540 450
StorEdge A5x00 (Tabletop)
5 54 2200 650
StorEdge A5x00 (Full rack)
42 394 13320 3900
StorEdge A3500 (Full rack)
42
8447 2475
StorEdge A3500 Controller
4
18 731 214
StorEdge 3120 (AC)
1
13.6 - -
StorEdge 3120 (DC)
1
13.6 - -
StorEdge 3310 (AC)
2 27 785 -
StorEdge 3310 (DC)
2 27 785 -
StorEdge 3510 (AC)
2 25.8 785 -
StorEdge 3511 (AC)
2 28.7 785 -
StorEdge 3510 (DC)
2 28.7 785 -
StorEdge 3511 (DC)
2 28.7 785 -
StorEdge A/D1000
4 28.4 1092 260
StorEdge D2
4
28.6
1092
260
StorEdge S1
1
8.16
512
150
D240 (Rackmount)
2
22.8
341
100
D240 (Tabletop)
2
27.2
341
100
StorEdge Flexipack
13
6.7
125
36.5
StorEdge Multipack
5
12.8
900
265
StorEdge FC Multipack
5
12.7
900
185
Storage Unipack
2
3.6
125
36.5

Friday, 30 December 2011

Simple command line email on Mac using gmail account

Here's a simple 3 step process for configuring you mac to send email from the command line using a gmail account.  You will need to:
  1. Install macports if you haven't already
  2. Install ssmtp from macports
  3. Update the ssmtp configuration files
Step 1, Install macports

If you haven't already installed macports go here: macports and get it, and install it.


Step 2, Install ssmtp from macports

Open a terminal window and use the following to install the ssmtp software
$ sudo port install ssmtp

Step 3, Update the ssmtp configuration files

Using your fav editor, make the following changes to the non-existent ssmtp.conf file:

$ sudo vi /opt/local/etc/ssmtp/ssmtp.conf

root=yourgmailaccount@gmail.com
mailhub=smtp.gmail.com:587
rewriteDomain=
hostname=yourgmailaccount@gmail.com
UseSTARTTLS=YES
AuthUser=gmail_username_here
AuthPass=gmail_password_here
FromLineOverride=YES

Now edit the rev aliases file

$ sudo vi /opt/local/etc/ssmtp/revaliases


root:yourgmailaccount@gmail.com:smtp.gmail.com:587
rob:yourgmailaccount@gmail.com:smtp.gmail.com:587

Step 4, Test

Test that it works, from the command line:
$ /opt/local/sbin/ssmtp rob@somewhere.com
Subject: some subject
this is some text
^d 

(Use ctrl d to after you've finished writing your message.)

Tuesday, 30 August 2011

Drupal Error - PHP Warning: Unknown: POST Content-Length of 796 bytes exceeds the limit of -2147483648 bytes in Unknown on line 0

The following error appears in your apache log and it's not possible to do a lot on your drupal site....

PHP Warning:  Unknown: POST Content-Length of 796 bytes exceeds the limit of -2147483648 bytes in Unknown on line 0

This was caused by changing the values in the php.ini for the file upload max size.  Ensure that you encase all values in speech marks.

post_max_size = "1024M"
upload_max_filesize = "1024M"

Friday, 1 April 2011

How to install the latest ImageMagick on AWS

Amazon is still a fair bit behind the latest versions of ImageMagick.  If you need a latter release then follow these instructions.

Get rid of the old version
# yum remove ImageMagick

Install the dependancies
# yum install wget tcl-devel libpng-devel libjpeg-devel ghostscript-devel bzip2-devel freetype-devel libtiff-devel

Now get ImageMagick from http://www.imagemagick.org/script/download.php and download the latest source with wget or curl.

Extract it
# tar zxvf ImageMagick-x.x.x-x.tar.gz

Build it
# configure --prefix=/usr/local --with-bzlib=yes --with-fontconfig=yes --with-freetype=yes --with-gslib=yes --with-gvc=yes --with-jpeg=yes --with-jp2=yes --with-png=yes --with-tiff=yes
# make clean
# make
# make install


Then you should be hot to trot. Type convert -version to see the upgraded version number.

Sunday, 13 March 2011

Mirroring Root Disk with DiskSuite - mirror_root Shell Script

I wrote this script now almost decade ago, and actually had to use it the other day. Love it when that happens...

On Solaris 2.6 (With DiskSuite installed), 7, 8, 9 and 10 this will mirror your root disk to another using disksuite and then reboot the box to attach the mirror.


#!/usr/bin/ksh
#
# Purpose: Script to mirror root disk using Solstice Disksuite.
# Rob Brown 14/05/2001
#
ROOTDISK=$1
ROOTMIRROR=$2
METADBSLICE=$3
PATH=$PATH:/usr/opt/SUNWmd/sbin:/usr/dt/bin:/usr/openwin/bin:/bin:/usr/bin:/usr/ucb:/usr/sbin:/usr/openwin/bin

#
# Sanity Chk. Ensure Binaries exist and
# determine Paths to them. Also ensure no
# disksuite metadb's have been configured.
# Check users has sufficent permissions and check
# they are frood enough to continue.
#

#
# Configure Paths
#
if [ -f /usr/opt/SUNWmd/sbin/metastat ]; then
METASTAT=/usr/opt/SUNWmd/sbin/metastat
METADB=/usr/opt/SUNWmd/sbin/metadb
METAINIT=/usr/opt/SUNWmd/sbin/metainit
METATTACH=/usr/opt/SUNWmd/sbin/metattach
METAROOT=/usr/opt/SUNWmd/sbin/metaroot
MDTAB=/etc/opt/SUNWmd/md.tab

elif [ -f /usr/sbin/metastat ]; then
METASTAT=/usr/sbin/metastat
METADB=/usr/sbin/metadb
METAINIT=/usr/sbin/metainit
METATTACH=/usr/sbin/metattach
METAROOT=/usr/sbin/metaroot
MDTAB=/etc/lvm/md.tab

else
echo No Disksuite binaries found. Please ensure it is installed.
exit 1
fi


#
# Do Any metadbs already exist?
#
${METADB} > /dev/null
if [ "$?" -ne "1" ]
then
echo "Metadb's may exist, or funny return code from metadb. Please clear down before rerunning ${0}."
exit 1
fi


#
# Is user root?
#
ID=`id`
USER=`expr "${ID}" : 'uid=\([^(]*\).*'`

if [ "${USER}" != "0" ]; then
echo "You must be root to run $0"
exit 1
fi


#
# Are Disk variables populated?
#
if [ "${ROOTDISK}" = "" ] || [ "${ROOTMIRROR}" = "" ] || [ "${METADBSLICE}" = "" ]; then
echo "Information missing: "
echo "Usage: $0 rootdisk rootmirror metadbslice"
echo "e.g. ${0} c1t0d0 c1t1d0 s7"
exit 1
fi


#
# Main
#
echo "Backing up old system/vfstab..."
cp /etc/vfstab /etc/vfstab.pre-`basename ${0}`
cp /etc/system /etc/system.pre-`basename ${0}`


#
# Write vtoc and check, bomb out on any errors.
#
echo "Writing ${ROOTDISK}'s vtoc ---> ${ROOTMIRROR}..."
prtvtoc /dev/rdsk/${ROOTDISK}s2 > /tmp/root-vtoc
fmthard -s /tmp/root-vtoc /dev/rdsk/${ROOTMIRROR}s2

FMTHARD_RTN=${?}
if [ "${FMTHARD_RTN}" -ne "0" ]; then
echo "Error Writing the vtoc from ${ROOTDISK} to ${ROOTMIRROR}, are they"
echo "the same type/size of disk?? Exiting."
exit
fi

echo "Creating MetaDatabases..."
${METADB} -a -c 3 -f ${ROOTDISK}${METADBSLICE}
${METADB} -a -c 3 -f ${ROOTMIRROR}${METADBSLICE}

echo "Meta DataBase: "
${METADB}

for SLICE in `cat /tmp/root-vtoc |grep -v '*' |awk '{print $1}'`
do
if [ ${SLICE} -eq "2" ] || [ ${SLICE} -eq `echo ${METADBSLICE} |cut -c2` ]
then
echo Not Touching slice ${SLICE} as it is either the MetaDB or the backup Slice.
else
echo Creating Sub Disks and Mirroring Slice ${SLICE}
MD_ROOT="d`expr ${SLICE} + 10`"
MD_MIRR="d`expr ${SLICE} + 20`"
MD_MIRROBJECT=d${SLICE}
${METAINIT} -f ${MD_ROOT} 1 1 ${ROOTDISK}s${SLICE}
${METAINIT} ${MD_MIRR} 1 1 ${ROOTMIRROR}s${SLICE}
${METAINIT} ${MD_MIRROBJECT} -m ${MD_ROOT}

echo "${METATTACH} ${MD_MIRROBJECT} ${MD_MIRR}" >> /etc/rc3.d/S98finish_mirror

cp /etc/vfstab /etc/vfstab.pre_rootmirror
cp /etc/vfstab /tmp/vfstab

if [ ${SLICE} -eq "0" ]
then
${METAROOT} ${MD_MIRROBJECT}
else
# Need to change entry in vfstab
echo "Altering the vfstab..."
cat /etc/vfstab |sed -e "s/\/dsk\/${ROOTDISK}s${SLICE}/\/md\/dsk\/${MD_MIRROBJECT}/" > /tmp/vfstab
cp /tmp/vfstab /etc/vfstab
cat /etc/vfstab |sed -e "s/\/rdsk\/${ROOTDISK}s${SLICE}/\/md\/rdsk\/${MD_MIRROBJECT}/" > /tmp/vfstab
cp /tmp/vfstab /etc/vfstab
fi
fi
done

# Create md.tab, and make the finish_mirror script runable at next boot.
echo "${METASTAT} -p >> ${MDTAB}" >> /etc/rc3.d/S98finish_mirror
echo "/usr/bin/rm /etc/rc3.d/S98finish_mirror" >> /etc/rc3.d/S98finish_mirror
chmod 755 /etc/rc3.d/S98finish_mirror

echo "This system must now be rebooted, to attach new mirrors."

Thursday, 3 March 2011

Monitoring MacOS X host with SNMP and Cacti

I've been monitoring some hosts with cacti and needed to add a MacOS X host in.  This is how to configure SNMP on Snow Leopard and configure cacti.

Edit your /etc/snmp/snmpd.conf on the Mac and place the following into it:

rocommunity public
includeAllDisks 10%


Once saved, start the snmpd daemon with:

sudo launchctl load -w /System/Library/LaunchDaemons/org.net-snmp.snmpd.plist

Thats it from the Mac side, now in cacti add it as a you would any other device, but also add a graph type of "[SNMP - Get Processor Information]" to get the processor information broken down by core.

Thats it.  You should start seeing some graphs like the following:

Sunday, 13 February 2011

Goa Mix Cue Sheets

Tried everywhere to find some cue sheets for the two CD edition of the original 1994 Essential Mix - Goa Mix and finally had to create my own from different sources.

Here's the first CD:

PERFORMER "Paul Oakenfold"
TITLE "The Goa Mix - Silver"
FILE "cd1.mp3" mp3

TRACK 01 AUDIO 
 TITLE "Give Me Life" 
 PERFORMER "Mr V"
 INDEX 01 00:52:00
TRACK 02 AUDIO 
 TITLE "Skin On Skin (Orange Mix)" 
 PERFORMER "Grace"
 INDEX 01 1:53:11
TRACK 03 AUDIO 
 TITLE "Point Zero" 
 PERFORMER "Li Kwan"
 INDEX 01 8:07:21
TRACK 04 AUDIO 
 TITLE "De Niro (Spaceflight Mix)" 
 PERFORMER "Disco Evangelists"
 INDEX 01 13:29:95
TRACK 05 AUDIO 
 TITLE "Vaporise" 
 PERFORMER "Virtual Symmetry"
 INDEX 01 15:30:80
TRACK 06 AUDIO 
 TITLE "Tears In The Rain" 
 PERFORMER "Vangelis"
 INDEX 01 20:23:37
TRACK 07 AUDIO 
 TITLE "Eugina (Pacific Diva Mix)" 
 PERFORMER "Salt Tank"
 INDEX 01 22:17:35
TRACK 08 AUDIO 
 TITLE "LSD" 
 PERFORMER "Hallucinogen"
 INDEX 01 23:51:02
TRACK 09 AUDIO 
 TITLE "Only Love Can Break Your Heart" 
 PERFORMER "Saint Etienne"
 INDEX 01 29:43:62
TRACK 10 AUDIO 
 TITLE "Vampire Hunters" 
 PERFORMER "Wojciech Kilar"
 INDEX 01 29:59:84
TRACK 11 AUDIO 
 TITLE "Alcatraz" 
 PERFORMER "Electrotete"
 INDEX 01 30:59:61
TRACK 12 AUDIO 
 TITLE "Main Titles" 
 PERFORMER "Vangelis"
 INDEX 01 37:00:39 
TRACK 13 AUDIO 
 TITLE "Floor Essence" 
 PERFORMER "Man With No Name"
 INDEX 01 39:00:89
TRACK 14 AUDIO 
 TITLE "Bugcatcher" 
 PERFORMER "Scorpio Riding"
 INDEX 01 45:02:58
TRACK 15 AUDIO 
 TITLE "Evolution" 
 PERFORMER "Man With No Name"
 INDEX 01 48:01:97

and the second

PERFORMER "Paul Oakenfold"
TITLE "The Goa Mix - Gold"
FILE "cd2.mp3" mp3

TRACK 01 AUDIO
 TITLE "Inner City Life" 
 PERFORMER "Goldie"
 INDEX 01 00:00:00
TRACK 02 AUDIO
 TITLE "Love Remembered" 
 PERFORMER "Wojciech Kilar"
 INDEX 01 01:36:61
TRACK 03 AUDIO
 TITLE "Co-Incidence" 
 PERFORMER "Voodoo People"
 INDEX 01 03:09:17
TRACK 04 AUDIO
 TITLE "Stimuli" 
 PERFORMER "The Infinity Project"
 INDEX 01 06:23:62
TRACK 05 AUDIO
 TITLE "Wake Up! (Trance Mix)" 
 PERFORMER "Trance Team"
 INDEX 01 10:59:03
TRACK 06 AUDIO
 TITLE "Heretic Voices (Angeles Mix)" 
 PERFORMER "V-Tracks"
 INDEX 01 14:02:05
TRACK 07 AUDIO
 TITLE "Schöneberg (Marmion Remix)" 
 PERFORMER "Marmion"
 INDEX 01 16:11:63
TRACK 08 AUDIO
 TITLE "Hierophone" 
 PERFORMER "Karl Biscuit"
 INDEX 01 23:13:74
TRACK 09 AUDIO
 TITLE "Rachel's Song" 
 PERFORMER "Vangelis"
 INDEX 01 25:42:30
TRACK 10 AUDIO
 TITLE "Sun (Oakenfold & Osborne Mix)" 
 PERFORMER "Virus"
 INDEX 01 27:19:70
TRACK 11 AUDIO
 TITLE "Deliverance" 
 PERFORMER "Man With No Name"
 INDEX 01 35:27:66
TRACK 12 AUDIO
 TITLE "Reach Up! (Indian Summer Mix)- Remix - Man With No Name" 
 PERFORMER "Perfecto Allstarz"
 INDEX 01 42:40:72
TRACK 13 AUDIO
 TITLE "Song Of Liberation" 
 PERFORMER "Para-Dizer"
 INDEX 01 48:09:74
TRACK 14 AUDIO
 TITLE "Sanvean" 
 PERFORMER "Dead Can Dance"
 INDEX 01 53:35:54
TRACK 15 AUDIO
 TITLE "Eternal Spirit (Northern Mix)" 
 PERFORMER "4Voice"
 INDEX 01 57:08:23
TRACK 16 AUDIO
 TITLE "Sugar Rush" 
 PERFORMER "Man With No Name"
 INDEX 01 61:00:10

Friday, 11 February 2011

Tour de France iCal - Calendar Feed

Updated for the 2015 Tour de France!!!
Updated for the 2014 Tour de France!!
Updated for the 2013 Tour de France!
Updated for the 2012 Tour de France

Tour fan?  Want to know what stage is on at what time so you can organise your TV viewing around your work schedule (kidding - kind of)?  Want it to dynamically update your calendar as the Tour develops?

Well how's this look...


I've setup an iCal feed for the Tour De France which you can subscribe too.  If you use your iCal compliant calendaring tool (iCal.app on Mac or Outlook on PC, or your iPhone) then it will display all the stage details on the days that they happen.

You can see below that it creates a separate Calendar so won't write over the top of any other calendars you have, and can easily be toggled on and off.


As I get updates on the start times, distances and anything else I find interesting I'll update the feed and you will automagically see the updates in your calendar.

This will work (providing anybody uses it) for subsequent years of the TDF as well and will populate as the data becomes publicly available.

I've tested this on iPhone and Mac iCal, just clicking on this:

webcal://openstripe.com/iCals/icalgen.php?cal=tdf

Not sure about other clients, you may need to use the standard http protocol from other apps.

http://openstripe.com/iCals/icalgen.php?cal=tdf

Make sure you subscribe and don't just download the calendar entries otherwise you won't get any updates.

Please leave me a comment if you find this useful, it will help me find the five minutes needed to update the calendar with the stage details.

How to use with Outlook

 You can subscribe this calendar in outlook by doing the following.

"File" -> "Account Settings" -> "Account Settings" -> "Internet Calendars" -> "New" -> "webcal://shermanroad.dyndns-home.com/cals/icalgen.php?cal=tdf"

Change the Name to "Tour de France" or something meaningful for you.

You should then be able to toggle it on and off as a new calendar.

Thursday, 10 February 2011

Sheeva Plug Problems and Fixes

Problem)
PHP errors with "PHP Fatal error:  Call to undefined function curl_init()"

Fix)
apt-get install php5-curl; /etc/init.d/apache2 restart

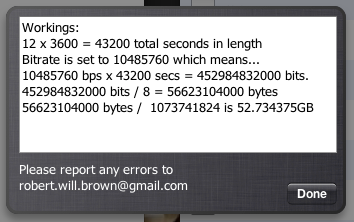
MacOS X Widgets - Video File Size Calculator

A while back wrote a simple widget for MacOS X which calculates the file size of Video files based on their length and Bitrate.


It also shows the workings on the reverse!


Just in case anyone might want it, and so I know where it is when I do...

You can download it here: Download Link

Saturday, 5 February 2011

To toggle the "Tick" in a UITableViewCell

To check or uncheck a "tick" box in a UITableViewCell cell and also unhighlight it afterwards.

First make sure it's accessoryType is set:

cell.accessoryType = UITableViewCellAccessoryCheckmark;

And then in the didSelectRowAtIndexPath method:


// Toggle the "Tick" on and off
UITableViewCell *cell = [tableView cellForRowAtIndexPath:indexPath];

if (cell.accessoryType == UITableViewCellAccessoryCheckmark) {
cell.accessoryType = UITableViewCellAccessoryNone;
}else if (cell.accessoryType == UITableViewCellAccessoryNone) {
cell.accessoryType = UITableViewCellAccessoryCheckmark;
}
// This removes the highlighting of the Cell
[tableView deselectRowAtIndexPath:indexPath animated:YES];

Friday, 4 February 2011

A call to all Xcode / iPhone tutorial writers

I'm trying to learn some iPhone development using xcode - It's real difficult.  Xcode is really painful to learn.  It's often made even more confusing by Interface Builder the tool for graphically designing apps.

Why does a company so steeped in design and graphical loveliness make it impossible to graphically layout the majority of your app?

I've been trying for a day and a half to learn how to select an option in a list and navigate to a different view when it is selected - I'm still not there, why is this so difficult?!  I'm on probably my 13th tutorial but I'm suffering badly with these as well.  And there's two common problems with them:
  1. Not providing downloadable code.  I've worked my way through at least 5 which plain out just didn't work.  If I can download the code I can check it works, does what I need, and only then read the tutorial.
  2. Not explaining the Interface Builder actions well enough.

Here's an example of the second from an otherwise excellent tutorial:
"Once you have dragged this on connect the IBOutlet in the Driller App Delegate object to the Navigation Controller by dragging from the app delegate whilst holding the control key".  
WTF.  

I'm sure it's easy when you know, but if I knew I wouldn't be here looking at a tutorial.  As soon as you don't get this bit the rest of the article is then off limits.

Having said that however I'd like to thank everyone that has bothered to write tutorials.  But please provide the source code....

Monday, 31 January 2011

Thursday, 6 January 2011

Change the Password Complexity of Windows Server 2008

For a default install of windows server 2008 the password has to be overly complex.  This is a right pain in the ass.  To switch this off (this won't work if it's part of a domain) use the following:

Start -> All Programs -> Administrative Tools -> Local Security Policy

Open Account Policy and change the field "Password must meet complexity requirements" to disabled.

Tuesday, 6 April 2010

Upgrading Sun Ray DTU's to the GUI firmware

To upgrade all of the DTU's to the GUI firmware use the following command:

# /opt/SUNWut/sbin/utfwadm -AaV -f /opt/SUNWut/lib/firmware_gui

Wednesday, 12 August 2009

Provisioning Solaris using JET and Jumpstart

Background


Jumpstart and JET (Jumpstart Enterprise Toolkit) are used to provision Solaris systems locally and across a network.


Here’s how to use JET and Jumpstart to build either SPARC or x86 hardware. You can use either architecture to build any other architecture. In this example my jumpstart server is actually a Solaris 10 x86 VM on an ESX cluster.
What I used:

  • A Solaris 10 VM running on ESX as the Jumpstart Server.
  • JET package (http://www.sun.com/downloads)
  • Copy of the Solaris OE ISO (http://www.sun.com/downloads)
  • An ESX VM image to jumpstart as an x86 client.
  • A Sun T6320 sun4v server to Jumpstart as a SPARC client.
  • Copies of any packages you want to install.
  • Latest recommended patch bundle.

Ok so there are 10 basic steps:

  • Download and Install the JET packages
  • Configure DHCP
  • Create some missing directories & extra NFS shares
  • Copy the Solaris Media
  • Copy the recommended patch bundle
  • Copy any extra packages
  • Add the Client MAC address to /etc/ethers
  • Make a template for your host
  • Make the client configuration
  • Boot the client off of the network

Download and Install the JET packages

You can download the JET package from the Sun downloads website. The package is a single file that contains multiple packages. pkgadd the package and type “all” to install everything.
# bunzip2 JET.pkg.bz2
# pkgadd -d JET.pkg

The following packages are available:
1 JETEXPLO JET explo product
(sparc) 3.1.18

2 JETFLASH JET flash product
(sparc) 3.1.9

3 JETISO JET ISO product
(sparc) 1.0.0

4 JETJASS JASS product
(sparc) 3.0.15

.....output truncated......
Now add the following to your roots PATH variable.
# PATH=$PATH:/opt/SUNWjet/bin
# MANPATH=$MANPATH:/opt/SUNWjet/man
# export PATH MANPATH

Configure DHCP

If you are going to be jumpstarting x86 you will need to configure a DHCP server to provide an IP address to the PXE boot process. This step isn't required for a SPARC based install. JET comes with a script to create a DHCP environment, but it's shipped without the executable permission set. So fix this, then edit it and update the NETWORK, SUBNET and ROUTER variables with your site specific details.

# cd /opt/SUNWjet/Products/base_config/solaris/
# vi make_dhcp

NETWORK=172.18.100.0
NETMASK=255.255.255.0
ROUTER=172.18.100.1
Then make it executable and run it:

# chmod 755 make_dhcp
# ./make_dhcp
Created DHCP configuration file.
Created dhcptab.
Added "Locale" macro to dhcptab.
Added server macro to dhcptab - vm-03.
DHCP server started.
Added network macro to dhcptab - 172.18.100.0.
Created network table.

Create some missing directories & extra NFS shares

There are a couple of directories you will need later on that are not created for you. Make sure that your /export/install path has these three directories present.
# ls -l /export/install
total 9
drwxr-xr-x 2 root root 2 Feb 24 10:27 media
drwxr-xr-x 2 root root 2 Feb 24 17:47 patches
drwxr-xr-x 3 root root 3 Feb 24 17:36 pkgs
And make sure that you have the following NFS shares:
share -F nfs -o ro,anon=0 -d "JET Framework" /opt/SUNWjet
share -F nfs -o ro,anon=0 -d "JET Framework" /export/install
Note: Make sure you never share /export/install read write, the first jumpstart client will probably work but will change the Solaris OE layout meaning any proceeding build will fail, the easiest way to recover will be to remove the Solaris OE image and copy it again.

Copy the Solaris Media

JET needs to have a copy of the Solaris OE ingested into it. Multiple different versions of the OS can be added (you can list what is copied into JET with the list_solaris_locations command), and you need to give them a "JET name" - a shortened tag. In the example below I show you what I have in my JET infrastructure, then add a copy of the latest mainstream release of Solaris for SPARC.

greenpark:solaris# list_solaris_locations

Version Location
------- --------
SOL10_U6_X86 /export/Software/Sun/SunOS_JET/x86/5.10/U6/
SOL11_B106_SPARC /export/Software/Sun/SunOS_JET/sparc/5.11/b106
SOL11_B110_SPARC /export/Software/Sun/SunOS_JET/sparc/5.11/b110
#
# copy_solaris_media \
> -d /export/Software/Sun/SunOS_JET/sparc/5.10/U6 \
> -n SOL10_U6_SPARC \
> -i /share/Software/Sun/SunOS/sparc/5.10 \
> sol-10-u6-ga1-sparc-dvd.iso
Created loopback device /dev/lofi/1 for /share/Software/Sun/SunOS/sparc/5.10/sol-10-u6-ga1-sparc-dvd.iso
mounted /share/Software/Sun/SunOS/sparc/5.10/sol-10-u6-ga1-sparc-dvd.iso at /export/install/media/2291/slices/s0 (of type hsfs)
Copying Solaris image....
Verifying target directory...
Calculating the required disk space for the Solaris_10 product
Calculating space required for the installation boot image
Copying the CD image to disk...
Copying Install Boot Image hierarchy...
Copying /boot netboot hierarchy...
Install Server setup complete

Added Solaris image SOL10_U6_SPARC at the following location:
Media: /export/Software/Sun/SunOS_JET/sparc/5.10/U6

Unmounting /export/install/media/2291/slices/s0
removing device /dev/lofi/1
removing directory /export/install/media/2291

Now list the Solaris installs we have loaded into JET:

Version Location
------- --------
SOL10_U6_X86 /export/Software/Sun/SunOS_JET/x86/5.10/U6/
SOL10_U6_SPARC /export/Software/Sun/SunOS_JET/sparc/5.10/U6
SOL11_B106_SPARC /export/Software/Sun/SunOS_JET/sparc/5.11/b106
SOL11_B110_SPARC /export/Software/Sun/SunOS_JET/sparc/5.11/b110

Copy the Latest Recommended Patch Bundle

If you decided to download the latest recommended patch bundle to have JET automatically install as part of the system installation then copy and unzip to /export/install/patches now.

Copy Additional Packages

As the standard release of solaris doesn't include software such as vim, we have a set of packages that we choose to install on top of the OS image. You decide which package you will apply to which jumpstarted host latter when you create the template, but in order for the template to be able to use the additional software it needs to be loaded into JET in a similar manner to the Solaris media.
# pwd
/share/Software/Sun/SunFreeware/Sunfreeware_10_U6/sparc
# copy_custom_packages `pwd` sparc SFWvim
I prefer to load all the Sun freeware packages into my JET service up front. This prevents problems later so I don’t need to keep running this for every package I forget to add. A quick loop......
# for i in `ls`
> do
> echo $i
> copy_custom_packages `pwd` sparc $i
> done
SFWaalib
Transferring package instance
Packages copied
SFWaconf
Transferring package instance
Packages copied
SFWafio
Transferring package instance
Packages copied
SFWamake
.....output truncated.....
This loads these SPARC specific packages into your JET infrastructure, we need to do the same for our i386 packages as well substituting the "sparc" keyword for "i386". Obviously you need to download the x86 packages first. BE CAREFUL ADDING PACKAGES there's no mechanism to stop you from adding the SPARC packages in as i386 by mistake. It will only manifest itself when you have an installed your system after the jumpstart, and you’re packages are the wrong executables and don’t work.
We also have here an internal package that I like to install on all the servers I look after, it contains only scripts so is not architecture dependent. The package was created with a slightly different format to the Sun packages so errored as below:
# copy_custom_packages `pwd` sparc IOKOtools-0.195
pkgtrans: ERROR: unable to complete package transfer
- no packages were selected from
Error copying package IOKOtools-0.195... exiting
This is the method to copy these packages:
# pkgtrans IOKOtools-0.195 /tmp all
# cd /tmp
# copy_custom_packages `pwd` sparc IOKOtools
# copy_custom_packages `pwd` i386 IOKOtools
Add the Clients MAC address to /etc/ethers
Every client that boots broadcasts it’s MAC address to request a boot server to supply an IP address. You don’t have to do this, but I find it useful to have all of your systems mac addresses in a single file, this is what /etc/ethers is for. If you choose not to use /etc/ethers then you will need to add the MAC address to each host template which we go into in the next step.
# cat /etc/ethers
00:03:ba:42:50:33 v240-01
0:14:4f:cd:f3:8c t6320-01
.....output truncated......

Make a Template for your host

Within JET each host that you wish to Jumpstart will need a template describing things like partition sizes, disk mirroring, UFS/ZFS, IPMP, network config, etc. You can create this easily enough using the make_template command and passing it the architecture of the host the OS version you want to install on it and the hostname. Finally you can pass it what JET modules you want to use on that specific host, for instance you may want to use ZFS or flash archives to provision that host. The example below shows a regular solaris Niagara host that will be installed with Solaris 10 update 6 with ZFS additions.
# make_template -A sun4v -O SOL10_U6_SPARC t6320-01 zfs
Adding product configuration information for
+ base_config
+ zfs
Updating base_config template specifics
Client template created in /opt/SUNWjet/Templates
Now for an x86 client.

# make_template -A i86pc -O SOL10_U6_X86 vm-23 zfs
Now edit these templates in /opt/SUNWjet/Templates and configure them as needed.
Note!

One thing that isn’t greatly documented is to add grub to any x86 boxes to ensure that it correctly builds the PXE environment when you run the make_client below.
base_config_client_allocation="grub"

Make the client configuration

We must now let JET read in all the detail from the template and configure the BOOTP/DHCP/NFS and all other components that make up the Jumpstart environment. This is the final step to make the server functional. Note the slight difference in output from the two clients created. Ones SPARC and requires a bootparams boot setup and the other is x86 and requires a PXE environment. Ensure that any x86 client has the relative lines highlighted below.

First the SPARC with bootparams details highlighted:
# make_client -f t6320-01
Gathering network information..
Client: 172.18.100.18 (172.18.100.0/255.255.255.0)
Server: 172.18.100.19 (172.18.100.0/255.255.255.0, SunOS)
Adding t6320-01 to local /etc/hosts
Merge hosts file /tmp/addhost.13080 with /etc/inet/hosts
Solaris: client_prevalidate
Clean up /etc/ethers
Solaris: client_build
Creating sysidcfg
WARNING: no base_config_sysidcfg_timeserver specified using JumpStart server
Creating profile
Adding base_config specifics to client configuration
Solaris: Configuring JumpStart boot for t6320-01
Solaris: Configure bootparams build
Starting SMF services for JumpStart
cleaning up preexisting install client "t6320-01"
removing t6320-01 from bootparams
removing /tftpboot/inetboot.SUN4V.Solaris_11-3
updating /etc/bootparams
copying boot file to /tftpboot/inetboot.SUN4V.Solaris_11-3
Force bootparams terminal type
-Restart bootparamd
Running '/opt/SUNWjet/bin/check_client t6320-01'
Client: 172.18.100.18 (172.18.100.0/255.255.255.0)
Server: 172.18.100.19 (172.18.100.0/255.255.255.0, SunOS)
Checking product base_config/solaris
Checking product custom
--------------------------------------------------------------
Check of client t6320-01
-> Passed....
Then the x86 with highlighted PXE details:
# make_client -f vm-09
Gathering network information..
Client: 172.18.100.109 (172.18.100.0/255.255.255.0)
Server: 172.18.100.19 (172.18.100.0/255.255.255.0, SunOS)
Adding vm-09 to local /etc/hosts
Merge hosts file /tmp/addhost.16207 with /etc/inet/hosts
Solaris: client_prevalidate
Clean up /etc/ethers
Solaris: client_build
Creating sysidcfg
WARNING: no base_config_sysidcfg_timeserver specified using JumpStart server
Creating profile
Adding base_config specifics to client configuration
Solaris: Configuring JumpStart boot for vm-09
Solaris: Configure PXE/grub build
Starting SMF services for JumpStart
Adding install client
Doing a TEXT based install
Leaving the graphical device as the primary console
Configuring vm-09 macro
Using local dhcp server
PXE/grub configuration complete
Running '/opt/SUNWjet/bin/check_client vm-09'
Client: 172.18.100.109 (172.18.100.0/255.255.255.0)
Server: 172.18.100.19 (172.18.100.0/255.255.255.0, SunOS)
Checking product base_config/solaris

WARNING: Patch 119375-03 may need to be applied to the boot image.
Please determine if the miniroot is patched and apply if required.
You can suppress this warning by typing:
# touch /export/install/media/SunOS/x86/5.10/u6/Solaris_10/Tools/Boot/.JET-p1

Checking product custom
--------------------------------------------------------------
Check of client vm-09
-> Passed....

Boot the client off of the network

Booting the clients of the network is performed in different ways depending on which architecture your using.

On SPARC, if it’s already running an OS then you can use:

# reboot -- “ net - install”
or from the OBP prompt:
ok> boot net - install

On an x86 system you will need to reboot the host and then interrupt the boot sequence and initiate a PXE boot on the interface that you took the MAC address from to populate the Jumpstart servers /etc/ethers file.